Wednesday, September 19, 2012

CSS (Cascading Style Sheets)

CSS is a programming language which allows us to decide how a document will be shown on the web.As in HTML, in CSS you can also use any regular text editor, like notepad or others in order to create a stylesheet.Just remember saving the document as a .css file.
How does it work?
Very simple, with the CSS stylesheet you will modify HTML elements.You will do this by opening a new document and typing the following:
#text{color:#FF0000}

 
  1. Element name.

    Here we will introduce the name of the HTML element/s that we want to modify.
  2. Declaration

    The declaration, situated in between {} is the information that will change our HTML element.In case there is more than one delaration you use ; to seperate them.
  3. Atribute and value

    Inside the declaration, the atribute defines how the element will be changed and after that gives it a value.                                                                                                                          

Style in code


The style in code is directly putting the styles on the HTML document we want to modify.This is not the recommended type of style, we will always try to seperate the content from the presentation.


Example:<p style="color:#ff0000">This car is red</p>


Intern style


This style is defined in the HTML document , in between .To do so, inside of the head tag we will introduce our styles in between tags. 

Example:<head>
                <style type="text/css">p{color:#ff0000}</style>
               </head> 

External style


This is the most used.To modify any HTML element you will generate a stylesheet with your notepad or any text editor.Once finished save it as a .css file.Now all we have to do is introduce it into our HTML document between . 

Example:

Content of style.css:
p{color:#ff0000 ;}

Content of<head></head> in HTML file:
<link href="style.css" rel="stylesheet" type="text/css" />

You can generate and introduce all the archives you wish.

Thursday, September 13, 2012

Layers

Layers are a very used method by web pages using CSS  to customize them.You must imagine that a  layer is like a simple box we position on our web (we can give this box different color, position, form, dimensions...) and in the inside of it we will introduce the code preferred by us.I will now explain you the two type of layers that exist.They are very similar, but with one little exception.

DIV
This type of layer (box) will generate a line break as a result.


SPAN
This is a neutral element, which means that it won't add anything (unless you indicate so, using styles).


I  will now show you the clear difference between those two.When we introduce a span in any text, it can be read without any problems.But if we use the div layer it will introduce a line break in our text.


Look at this example:

This car is dark<span> red,</span> but the other one is blue.


This car is yellow,<div>while <div>the other one is green.


This car is dark red, but the other one is blue.

This car is yellow,

while
the other one is green.


Wednesday, September 12, 2012

Html lists

The most common list elements in HTML are ordered and unordered lists.The difference between these is that the ordered ones will appear in a numerical list, while the unordered ones will be inserted after a point.I made one example of each so you understand them better.

Ordered list:                    Unordered list:         

 <ol>                            <ul>
<li>German</li>            <li>German</li>
<li>Spanish</li>             <li>Spanish</li>
<li>English</li>              <li>English</li>
</ol>                             </ul>


Let`s look at the result:

Ordered
  1. German
  2. Spanish
  3. English
Unordered
  • German
  • Spanish
  • English  
So remember, to create an ordered/unordered list, the tags to create those are <ol> and <ul>.
For all the items in the list use <li>.


Besides the ordered/unordered lists you can also employ a definition list for your HTML webpage.These are composed of two elements, the term <dt> and the definition <dd>.


Definition list

<dl>
<dt>USA</dt>
<dd>United States of America</dd>
<dt>House</dt>
<dd>A building for human habitation</dd>
<dt>Bottle</dt>
<dd>A container, typically made of glass or plastic and with a narrow neck, used for storing liquids.</dd>
</dl>


And how it looks like in any internet explorer:
USA
United States of America
House
A building for human habitation
Bottle
A container, typically made of glass or plastic and with a narrow neck, used for storing liquids.

Monday, May 21, 2012

Allow your users to upload files.

With this element your user can upload different files like pictures, documents...It's tag is "file".It is very used in webpages using PHP or ASP.

<input type="file" name="files" />

How to create reset and submit buttons

These 2 buttons allow our user to reset a form or to submit it.

Submit


The tag is "submit" and it will send the form to the specificied order "action".
<input type="submit" name="button" value="submit" action=""/>


Reset


This button will empty all the selected options and entered text in a form.We will use the tag "reset".
<input type="reset" name="button" value="reset"/>


Try it on your own, create a form, add these 2 buttons and see what happens in any internet explorer.

How to create dropdown menus

It allows us to create a list of different options, that will not take as much space as creating a normal list.Dorpdown menus are usually used for large lists, as for example, to select a country.In order to create it we will use the <select name="selection"><select> and in between them we will type
<option value="">value</option> for each option that we want to introduce to our dropdown list.This element also has the "name" and "id" tags.
We can also add other attributes as:

Size:Defines the number of options that will appear on screen.

Multiple:When a dropdown menu is multiple, the user can select more than one option at the time by pressing the "control" button.

Selected:This is an attribute for the <option> tag.It indicates if an option is selected as default.

Let's take a look at this:


Favourite color:
<select name="selection">
<option value="Red">Red</option>
<option value="Blue">Blue</option>
<option value="Green">Green</option>
</select>

And this will be our result:

Favourite color:

Wednesday, May 16, 2012

Radiobuttons

This element allows our user to select from a series of options,with a selection-circle in front of it.By selecting an option, one that already was chosen get's deselected.The tag for radio buttons is:
<input type="radio" name="option" value="" />
In order to create a selection list, all the elements in it must have the same name and different values.
Radio buttons also have the attributes name, id, value and checked, which I explained in previous posts.
Example of a simple selection list:

 Favorite color: <br/>


Red<input type="radio" name="option" value="red" /><br/>
Blue<input type="radio" name="option" value="blue" /><br/>
Green<input type="radio" name="option" value="Green" /><br/>

Favorite color:
Red
Blue
Green

Friday, May 11, 2012

How to create checkboxes in Html

This element allow us to create a box, which the user can define as checked or unchecked.Checkboxes are mostly used in forms, that want people to select something or to mark their preferences.The tag we will use this time is:<input type:="checkbox" name="checkbox" />
Beside the attributes name, id and value we can use checked to make a box appear marked as default.
Example:

Favourite color:
Red: Blue:

Thursday, May 10, 2012

How to create password fields

Password fields are very usefull for sites that require a registration and a password key for access.Everything the user types in here, will appear hidden  in form of asterisks.In order to create a password field we will use the same tag as for regular text fields but instead of text, this time we will use the input type password.
So the tag will look like this:
<input type="password" name="password" id="password" />

Create Html text areas

These elements are used , when we want our user to wright a longer text.It allows us to define the number of lines and rows.The tag that we will employ is:<textarea></textarea>.
To define the length and width of our text area, we will use the following two attributes:

cols:Defines the number of columns.

rows:Defines the number of rows.

As the text fields in the previous post, this tag also posesses the name and id attributes.What we can not use for text areas is value, but we can add our text by typing it in between the <textarea> and </textarea> tags.

<html>
<head>
</head>
<body>
<textarea cols="30" rows="6" name="Example" id="Example">
Here goes our text
</textarea>
</body>
</html>

Wednesday, May 9, 2012

Html text fields

They possibly are the most used element in Html forms.The text fields allow us to request information from our users, which they can fill in by theirselves.The tag we will be using for this one is:
<input type="text" name="text" id="text" value=""/>
You may surely be wondering about the attributes name, id and value.I will give you a brief explanation:

name:This will be the name that we are giving our text field, it doesn't appear in the text field.

id:This is used in javascript.It gives the field a unique value on the whole website.

value:What you type between the quotes will appear in the text field, if you don't type anything, the field will appear empty.

There are also some more attributes you can add to Html text fields that are not obligatory:

disabled:As the name says by itself, the field is disabled.The user can't type any information in it.It is very used by websites that want you to fill in their fields one by one, so if you haven't filled in a field, the next one will be disabled.

maxlength:Gives the user a limit of characters to type in.

size:Defines the length of the text field in pixels.

Example of a form with all of the previous attributes:

<html>
<head></head>
<body>
<form>
<input type="text" name="Name" id="text" value="Name" /><br/><br/>
<input type="text" name="disabled" id="disabled" value="Disabled" disabled/><br/><br/>
<input type="text" name="maxlength" id="maxlength" value="8 characters max." maxlength="8"/><br/><br/>
<input type="text" name="size" id="size" value="This field has a length of 100" size="100"/>
</form>
</body>
</html>


Wednesday, May 2, 2012

How to create Html forms

Forms are a very used tool on all type of webpages.They are mostly employed to get
information of your users.
Forms are defined with the tags <form> and </form>.The first thing to know is what possible attributes this tag has.Here is a list:

name:will allow us to give the form a name.
method:Indicates the type of sending will be used.The 2 most common types are get and post.
With get the information being sent will be visible in the navigation bar, meanwhile with post
they remain invisible.And that's why 90% of the forms use the post method.
action:indicates an action to realize when the user has sent the form, like for example another webpage.


<form name="form" method="post" action="send.html" />

In the next post I will explain you the different elements we can include in a form.

Link types

There are different types of links in Html.I will explain them one by one in the list below.

Internal links:Those, which will send the user to different parts, inside the same page.

Local links:Are directed to other page on the same website.

Remote links:Will send user to another website.

E-mail links:Allows your users to send you an e-mail to a wished address.

Links with files:Lets your user download files.


Internal links


 Are those, which navigate to different parts of the same Html page.
Let's we want to insert a link that directs the user to the bottom of the page.First we will type the following tag :

<a href"#down">Go down</a>


We can observe that after href, in between the quotes we have placed the name of a tag which we will create on the bottom of the page.This name will always be proceeded of the number sign #.

<a name="down"></a>

By inserting this 2 tags in our page we generate a link that redirects the user to the bottom of the page.

Local links


 These links are used very commonly on  all kind of websites.Every page with more than 1 Html document will need Local links.They allow us to navigate in different html files.To create such link we will apply the tag <a href="name of the archive.html">Anchor text</a>

Remote links

They are used to send the user to another webpage out of ours.They are very common on different pages of the same niche.The format of remote links will be the following:

<a href="name of the website">Text to be displayed</a>


E-mail links


 Email links allow users to contact with us per e-mail.We will employ the following tag for this one:
<a href="mailto:your@adress.com>Your adress.com</a>

Links containing files 


 This type of links allow the user to download any file we want them to do so.The format for this one is the same as a normal link with the exception that we introduce the name of the archive.zip .pdf .doc .xls.. instead of the address.
 <a href="document.zip">Zip file </a>

How to insert links on our page

Links are very important for web creating, because they will allow us to navigate through different Html pages on our website , link to extern pages or link to download archives.The tag we will employ this time is <a href=""></a>.In the inverted comas we will place the link wich we want to use.Between <a href=""> and </a>, we will insert the anchortext, the text we want to be shown instead of the link.
Let's create a link to Youtube.In your Html editor or notepad type the follwing:


<a href=" http://www.youtube.com/">Youtube</a>

This done, our result should look like this:
 

Tuesday, May 1, 2012

How to add images to Html.

The use of images in web-designing is very popular at the time.Introducing them into our Html website 
isn't very difficult, you only have to remember that they must be in the formats GIF, JPEG or PNG.
The tag we will use this time is <img src="">.Now I will explain you some things you can do with your image:

- src: This will be obligatory if we want to upload an image to our website, because we will have to add the source of the image, so that our program can find it.

- align:Allows us to align our image on the website.We can use align="Top,Bottom,Left or Right".

- alt:This attribute accepst a text, which must describe our image  well in order for search engine robots to know what exactly the image shows.

- width:With this one we will define the height of our image in Html in pixels.

- height:Allow us to define the height of our image, again in pixels.

- border:Here we can create a border, surrounding the image.You define the anchor of it with pixels. 

Example: <img src="add your image's source here" alt="The description of the image here" width="200" height="200" border="1" align="right" />

Monday, April 30, 2012

Table attributes

The table tags have some attributes to give it a format.I made a list for you with all of them and their explanation :

-Tag: <table>
  
 "border":It will create a border around our cells and around all the table.
  
 "align":Aligns our table in relation to the object around.For example, imagine you've got a text and the table is on it's left side.If you know type align="right", it will appear on the right of the text.

 "background":Allows us to place a background picture.
                          Example:<table background="image1.jpg">

 "bgcolor":Gives the table a background color, using hexadecimal code system.
                   Example:<table bgcolor="#FF0000"> In this case we use red, look at the color codes.

 "bordercolor":Draws a border with the color you choose in hexadecimal code system.
                          Example:<table bordercolor"#0000FF">

 "height":We can adjust the height of our table defining it in pixels or percentage.
                 Example:<table height="100px">

 "width":The same as the previous one for the anchor of the table.

 "cellpadding": Defines the space between the border of a cell and it's content in pixels.
 
 "cellspacing":Defines the space between the borders of your table.

Now that you know all this about tables, why don't try creating your own table with some colors, header cells or maybe a background image?Remember that you can create a webpage with your simple notepad or wordpad.Simply save it as .html when finished and right click on it to open it in any wished browser.You can also download a free html editor or a trial version of coffecup or Dreamweaver.


Saturday, April 28, 2012

How to join table cells

Sometimes we will need to combine two or more different cells.For that we will use the <td></td> tag and the attribute 'colspan', to join horizontal cells or 'rowspan' for the vertical ones.
<td colspan="2"></td>.By changing the "2" to a wished number you can define how many cells you want to be joined.


Thursday, April 26, 2012

Tables with header cells.

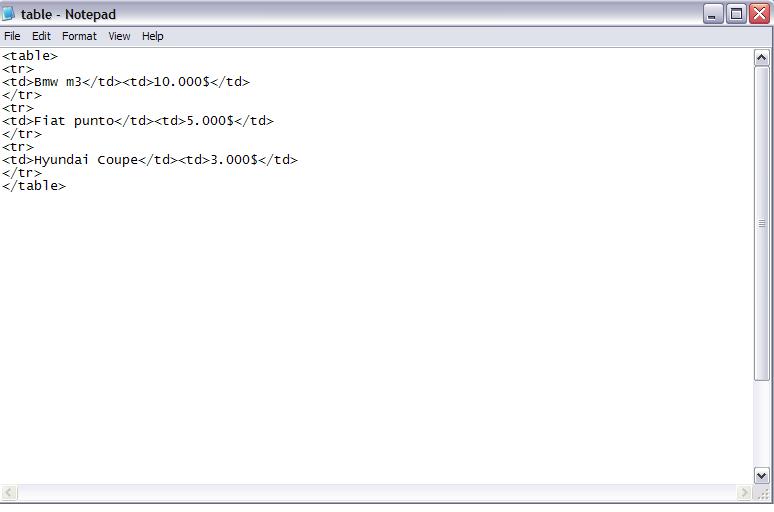
So now we know how to create a basic table but sometimes you will need your elements in the table to be classified in different sections.For this we will use header cells.Header cells are very useful for creating categories, for example let's say we have got a car sale webpage.Our header cells could contain something like Mercedes or any other brand.In the cell below, we could type the car model and below that we can let the user know the price.To create the mentioned cell, use the tag <th></th>.For all the other ones just do the same as with a basic table.
Example:

Wednesday, April 25, 2012

How to create Html tables

The simple table Html tag is created using the tags <table> and </table>.To define the table content you use the <tr></tr> tags for the rows and <td></td> for columns.


 Now you should get a simple table.


By now it looks good, but lets add a border to the table to give it a little bit of life.
You can do this by giving the table definition the attribute "border='1'".The border size is all up to you, to define it just type the size you prefer instead of 1 (size in px).If wanting a blank, cell you should use a white space (&nbsp;).This is done, because some browsers don't recognize white spaces and always need some content.The following example has got a 1 px border and a blank cell.


Monday, April 23, 2012

Html titles

This tags are fundamental for the structure and comprehension of your webpage.The format of the title tag is <h1></h1>,<h2></h2>...And so on until the <h6></h6> tag, which will be the smallest heading.<h1></h1>should be the most important title on your page, because it will appear as a big, bold text.So imagine you have a web that sells computers, the <h1></h1> should be something like "Computer sales".And a <h2></h2> title could be "Second hand computers".
I hope you now got a clear idea of what html headings are.
Example: